Quirky Coo Blog

Showing posts with label Prairie Chic. Show all posts

Monday, October 21, 2013

Rustic Elegance...An auction find turned to rustic elegance.

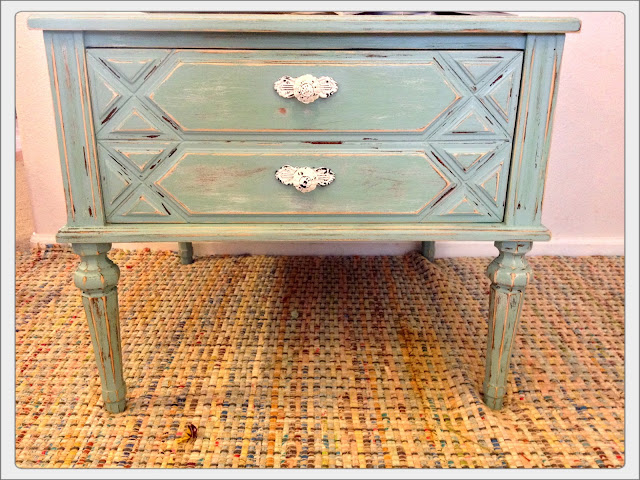
Hey guys! You must check out this beautiful dresser Kristy scored at an auction and redid for a client. She used a beautiful shade of a blue/green called Woodlawn Valley Haze. It's one of our favorite colors to use. It came out beautifully but unfortunately we do not have before pictures of the dresser, we forgot that part this time around (oops). However, you must check out this Rustic Elegance.


Check out the cute little surprise on the inside drawers
Isn't she a beauty? Now, don't forget if you are looking for unique piece and can't seem to find what you are looking for we have a variety of furniture waiting to be painted. Give us a shout on our blog, facebook page or email us at and we can customize anything you want.


Sunday, September 22, 2013

From boring to funky farmhouse upcycle

We're back!!!! Sorry for the delay of posts but we have had a busy summer and what a fantastic summer it was. We have tons of new stuff to share. Kimberly worked on a vintage telephone desk we scored at the auction. It went from boring to funky in a day. Check out the before and after's below...

Sneak Peak...

Before...

After...Chickens and Roosters seem to be popular out here in Wyoming so Kimberly found this adorable chicken print from Jo-Ann's Fabric Store and made it into a more modern and funky take on the chicken and rooster phenomenon happening this way.


The Details...

                                                           Until Next Time...
                                                               

Thursday, June 13, 2013

A Vintage Seed Packet inspired Mirror.

Hey Guys! Check out this ugly mirror we found at the Goodwill for 5 bucks. We found inspiration from vintage seed packets and turned it from a horrid brown to  Vintage Chic. It would be adorable to hang in your garden area to hold seed packets, a little girls room for cute decoration, or even your kitchen or living room to hold your keys and sunglasses next to your door! The possibilities are endless with this adorable upcycle. Check it out below..

Sneak Peek...


The Inspiration...


The Process...
we just primed it, slapped on some white paint, painted the flowers with left over candy apple red paint we had laying around, painted the stems and leaves with a green craft paint, added some touches of details, stained over parts of it to antique it and roughed it up for that Vintage chic look. We're in love with!


Now...Vintage Chic


 Hope you enjoyed this little fun and easy DIY inspired by old vintage seed packets and maybe given you a little inspiration to try a DIY of your own.

Until Next Time...
                                                              
Linked To...
http://www.lizmarieblog.com/2013/06/inspire-me-linky-party-15/
http://staceyembracingchange.com/2013/06/13/creative-inspirations-linky-party-42/


Wednesday, June 5, 2013

A Farm House Chic inspired Buffet makeover

Hi everyone! It's Kimberly from Prairie Sisters and I'm here to share with you my latest re purposed piece. We got this buffet from an auction for 25 bucks. That's a score! It looks as if it's from the 50's or 60's maybe. Anyway, It's been on the "to do list" and I finally got around to finishing it up. I contemplated on what I was going to do with it for a few months. I wanted a little more of a country look for this piece and I'm thrilled with the results. Here's what I did...


Sneak Peak... The bottom two drawers do not have knobs because they are grooved on each side for the functionality of opening and closing. I did not want to take away from the original function and beauty of the piece that I myself have never seen before. I thought it was cool and if I were to add the knobs they would have been off centered from the top two and would not have looked right anyway. Just in case anyone is wondering. : )

The Process...
This buffet went through many stages and different knobs.

BEFORE....


Materials..
1.  3 coats of....Pittsburgh Paint, Ultra Interior in Satin. Dutch Boy in Designer White.
 Materials...
1. Stained the doors and drawers with Minwax water based stain in Island Water.
2. Sanded that down after it dried a bit.

After...The top one was after I had finished and didn't like it. I felt it needed more character and I wasn't digging the white knobs. So I got out some Minwax water based stain in Coffee tint that I had used on my coffee table you can see that process here http://prairiesistersboutique.blogspot.com/2013/04/hey-guys-its-me-kimberly-from-prairie.html
I decided to stain the top and a light coat over the blue toned stain. It seeped in to the already exposing wood and just made it look so much cuter and aged. However, I was still confused about the newer knobs I had picked out.

Finally...After 2 weeks, and in the middle of house hunting, packing, and bad weather I managed to finish it. I LOVE it. I had to style it outside because well... 1.I couldn't get it inside by myself and 2...our house is full of boxes.


 The Details... I wanted it real rough looking. I sanded it down in places, and then went over certain exposed wood with a darker stain using a Minwax Stain Marker in Dark Walnut which whomever invented those markers are genius. They are like colored pencils for furniture.

I loved the 3rd set of knobs I chose. LOL. It took trial and error and many trips back to Hobby Lobby but I finally decided on these with the help of Kristy. I also decided to stain the back panel in the island blue for an added touch of detail as well as the insides of the drawers and sides.


This piece was a process but a good one. I love the results and look forward to doing more buffets.
Total Cost Break Down..
1. Buffet- $25
2. White Paint- $12
3. Island Blue stain- $13
4. Coffee Stain- Already had
5. Knobs-$12 for all 3.
Total Cost...$62.00

Until Next Time...
Linked Up To...


Wednesday, May 8, 2013

Beach Cottage Inspired Upcycle

Hey guys! It's me Kimberly again. Thought I'd share the newest piece for the Prairie Sisters booth. It's a side table from the Goodwill. All wood, dovetailed, granite ( I think?) on top, and in perfect condition. The price...$15. Yes, I know right???? Such a score. I went to Lowes picked up a color I've been lusting after and spent the entire day working on it. I'm so pleased at how it turned out. If my house was done in this beautiful color I'd probably keep it but......this beauty is going in the booth. It reminds me of  something you'd find at a lovely little beach cottage. I was there, on the sand, with my cute little white knitted sweater reading the latest romance novel as I painted this (in my head of course.) : )

Here's the breakdown............

Sneak Peak...


The before...Great bones, just horribly ugly.

 
The Process.... Sandpaper, Valspar paint in Woodlawn Valley Haze in Satin. By far my favorite color I've used. I took apart the drawer pulls and added some new ones, gutted it all, cleaned it up and sanded it down. I then primed it and painted every inch. I mean top, bottoms, sides, insides, sides you'll probably never see in your life if you purchase it, but I painted it. Oh yes, yes I did. Why? I got a little excited.
 
Oops...I started the entire process out on the driveway ( I promise honey) until it started to rain, so I pulled it inside the garage where my husband stores his precious babies. I hope he does not see that this happened.... next to his car. LOL.
 The color...Valspar, Woodlawn Valley Haze in Satin. Far right.
 Before I sanded it. I had to give it some warmth and lived life look. ; )
 
7 hours and a back ache later this beauty showed up with her glass slippers and all.
 
The Details...


Cinderella...Yes, I named her. I just so happened to be her Fairy Godmother for the day.
 
I almost burlapped the top of this but I decided that the (what I think is granite?) was to pretty to cover and it went beautifully with the color I used for the table.
 
Is that granite? I don't know but it sure looks pretty and it weighs a ton.
 
 
Do I have to sell this???? I don't want to but I have no place for it.
 
 
I sure am going to shed some tears when this one sells. : ( This is my proudest piece. I'm just so in love with this color and the way the details on the wood came out after sanding it that I can't help but want to keep it. Look for it soon at the PSB booth.

Hope this inspires you all to give a little love to those ugly pieces.

Until Next Time...........

Linked to...
http://staceyembracingchange.com/2013/05/09/creative-inspirations-linky-party-37/
http://www.lizmarieblog.com/2013/05/inspire-me-please-linky-party-10/
http://www.lambertslately.com/2013/05/create-it-thursday-1.html
http://www.rainonatinroof.com/2013/05/give-me-goods-monday-link-party-8.html